| Table of Contents |
|---|
Overview
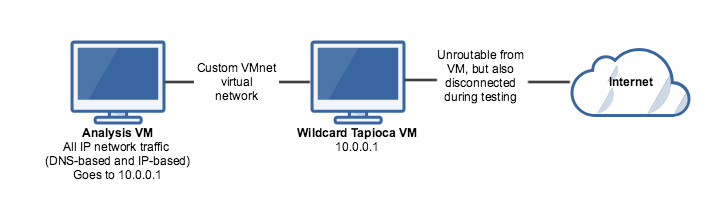
Let's say you have an exploit, and you're not sure what it does. Many exploits do something on the network. It would be nice to be able to observe these network operations, without actually being connected to the internet. Running an unknown exploit on an internet-connected machine is a bad idea. As it turns out, we can simulate an internet-connected machine by turning our CERT Tapioca VM into something that responds to everything (both DNS-addressed, and IP-addressed).
Step-by-step guide
- Start with a CERT Tapioca VM with dual ethernet adapters. I've found that Ubuntu 17.10 Server works well. For some reason, 18.04 Server has some issues related to VMware tools (copy/paste, HGFS) don't seem to be working well (yet?).
Disable systemd-resolved. It gets greedy with what it uses are DNS resolvers, and ends up picking up our wildcard DNS. This breaks DNS lookups on the wildcard VM itself, which we don't want.
Code Block language bash theme Midnight sudo systemctl disable systemd-resolved.service sudo service systemd-resolved stop
Put the following line in the {
main]section of your/etc/NetworkManager/NetworkManager.conf:Code Block language bash theme Midnight dns=default
Delete the symlink
/etc/resolv.confCode Block language bash theme Midnight rm /etc/resolv.conf
Restart network-manager
Code Block language bash theme Midnight sudo service network-manager restart
- Reconfigure your second (LAN side) NIC. When I made the changes above, it made an additional network adapter, leaving the already-configured one as a zombie. In my case, I clicked the network icon in the top right corner, deleted the old one, and reconfigured the new one.
Install tinydns
Code Block language bash theme Midnight sudo apt install tinydns
Configure tinydns
Code Block language bash theme Midnight sudo adduser --no-create-home --disabled-login --shell /bin/false dnslog sudo adduser --no-create-home --disabled-login --shell /bin/false tinydns sudo tinydns-conf tinydns dnslog /etc/tinydns/ 10.0.0.1 sudo mkdir -p /etc/service ; cd /etc/service ; sudo ln -sf /etc/tinydns/
Edit /etc/tinydns/root/data to resolve everything to 10.0.0.1:
Code Block theme Midnight title /etc/tinydns/root/data .local:10.0.0.1:a:259200 .0.0.10.in-addr.arpa:10.0.0.1:a:259200 .:10.0.0.1 +*:10.0.0.1:86400 +*.local:10.0.0.1:86400
build the configuration in
/etc/tinydns/root/data:Code Block language bash theme Midnight sudo make
Restart tinydns:
Code Block language bash theme Midnight sudo svc -h /etc/service/tinydns
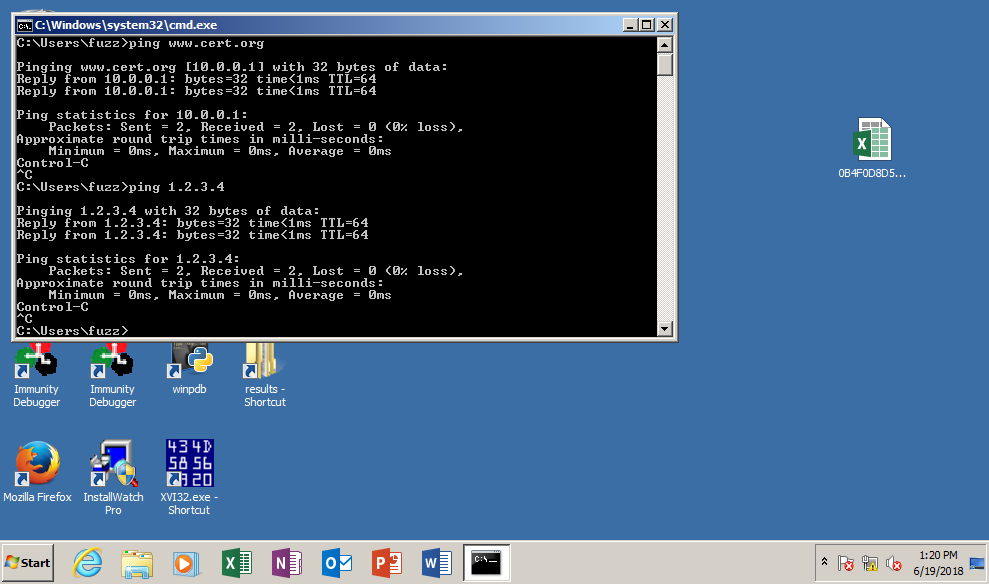
Confirm your dns lookups:
Code Block language bash theme Midnight tapioca@ubuntu:~/tapioca$ nslookup asdf 10.0.0.1 Server: 10.0.0.1 Address: 10.0.0.1#53 Name: asdf.localdomain Address: 10.0.0.1
Edit the
~/tapioca/iptables_noproxy.shfile, wiping out theNAT Magicpart at the end, replacing it with:Code Block language bash theme Midnight # NAT magic iptables -t nat -F PREROUTING iptables -t nat -A PREROUTING -i $internal_net -j DNAT --to-destination 10.0.0.1
The iptables DNAT line will rewrite the target of traffic arriving on the LAN-side adapter to be handled by
10.0.0.1Edit the
~/tapioca/iptables_mitmproxy.shfile, wiping out the NAT Magic part, replacing it with:Code Block language bash theme Midnight # mitmproxy interception iptables -t nat -F PREROUTING iptables -t nat -A PREROUTING -p tcp --dport 80 -j REDIRECT --to-ports 8080 iptables -t nat -A PREROUTING -p tcp --dport 443 -j REDIRECT --to-ports 8080 iptables -t nat -A PREROUTING -i $internal_net -j DNAT --to-destination 10.0.0.1
Create a
~/tapioca/wildcard.shscript to start mitmproxy HTTP(S) interception automatically on boot:Code Block language bash theme Midnight title ~/tapioca/wildcard.sh #!/bin/bash echo Setting network redirection rules... cd /home/tapioca/tapioca /home/tapioca/tapioca/proxy.sh
Ensure that the
~/tapioca/wildcard.sh is executableCode Block theme Midnight chmod +x ~/tapioca/wildcard.sh
Configure the script to start automatically on X starting.
Code Block language bash theme Midnight mkdir -p ~/.config/autostart nano -w ~/.config/autostart/.desktop
Edit the
.desktopfile to look like this:Code Block theme Midnight title ~/.config/autostart/.desktop [Desktop Entry] Encoding=UTF-8 Name=Wildcard Comment=Wildcard network redirection Exec=/home/tapioca/tapioca/wildcard.sh Terminal=false
Click the Red 'X' in the wildcard VM to run the new wildcard rules (or just reboot).
Connect a testing VM to the same vmnet network as the LAN adapter of your new wildcard VM, and try some network stuff.
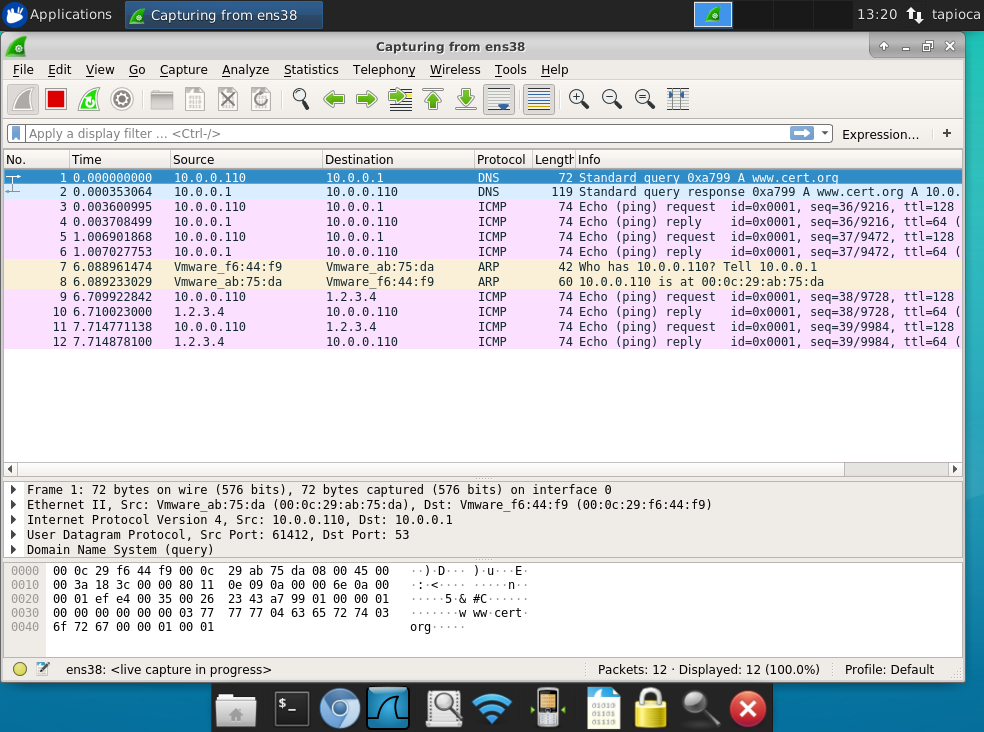
- Confirm the traffic on the server side:
(optional) configure wildcard VM to automatically log in the tapioca user
Code Block language bash theme Midnight sudo apt install mingetty systemctl edit getty@tty1
Configure it to look like this:
Code Block language bash theme Midnight [Service] ExecStart= ExecStart=-/sbin/mingetty --autologin tapioca --noclear %I
Install apache and php, as you'll likely at least want a web server to simulate
Code Block theme Midnight sudo apt-get install apache2 sudo apt-get install php libapache2-mod-php sudo a2enmod ssl sudo a2ensite default-ssl sudo systemctl reload apache2
- Create a shortcut for the apache2 log tail
- Right click in the XFCE panel
- Click Panel → Add new items
- Click Launcher and then Add
- Right-click the new panel icon and click Properties
- Click
Add a new empty item - Call it what you want in the
Namefield. e.g. "Apache log tailer" - In the
Commandfield, enter:sudo tail -F /var/log/apache2/access.log - For the icon, select
logviewer - Check the
Run in terminalcheckbox
...