| HTML |
|---|
<div style="background-color: yellow; border: 2px solid red; margin: 4px; padding: 2px; font-weight: bold; text-align: center;">
This page was moved to <a href="https://github.com/CERTCC/tapioca/wiki/Tapioca-Tutorials">https://github.com/CERTCC/tapioca/wiki/Tapioca-Tutorials</a>
<br>
Click in the link above if you are not automatically redirected in 3 seconds.
</div>
<meta http-equiv="refresh" content="3; URL='https://github.com/CERTCC/tapioca/wiki/Tapioca-Tutorials'" />
|
...
Let's say you have an exploit, and you're not sure what it does. Many exploits do something on the network. It would be nice to be able to observe these network operations, without actually being connected to the internet. Running an unknown exploit on an internet-connected machine is a bad idea. As it turns out, we can simulate an internet-connected machine by turning our CERT Tapioca VM into something that responds to everything (both DNS-addressed, and IP-addressed).
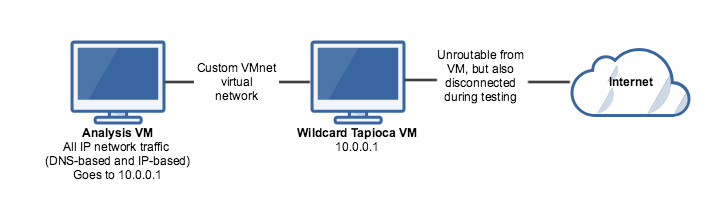 Image Removed
Step-by-step guide
...
Disable systemd-resolved. It gets greedy with what it uses are DNS resolvers, and ends up picking up our wildcard DNS. This breaks DNS lookups on the wildcard VM itself, which we don't want.
| Code Block |
|---|
| language | bash |
|---|
| theme | Midnight |
|---|
|
sudo systemctl disable systemd-resolved.service
sudo service systemd-resolved stop |
Put the following line in the {main] section of your /etc/NetworkManager/NetworkManager.conf:
| Code Block |
|---|
| language | bash |
|---|
| theme | Midnight |
|---|
|
dns=default |
Delete the symlink /etc/resolv.conf
| Code Block |
|---|
| language | bash |
|---|
| theme | Midnight |
|---|
|
rm /etc/resolv.conf |
Restart network-manager
| Code Block |
|---|
| language | bash |
|---|
| theme | Midnight |
|---|
|
sudo service network-manager restart |
...
Install tinydns
| Code Block |
|---|
| language | bash |
|---|
| theme | Midnight |
|---|
|
sudo apt install tinydns |
...
Configure tinydns
| Code Block |
|---|
| language | bash |
|---|
| theme | Midnight |
|---|
|
sudo adduser --no-create-home --disabled-login --shell /bin/false dnslog
sudo adduser --no-create-home --disabled-login --shell /bin/false tinydns
sudo tinydns-conf tinydns dnslog /etc/tinydns/ 10.0.0.1
sudo mkdir -p /etc/service ; cd /etc/service ; sudo ln -sf /etc/tinydns/ |
Edit /etc/tinydns/root/data to resolve everything to 10.0.0.1:
| Code Block |
|---|
| theme | Midnight |
|---|
| title | /etc/tinydns/root/data |
|---|
|
.local:10.0.0.1:a:259200
.0.0.10.in-addr.arpa:10.0.0.1:a:259200
.:10.0.0.1
+*:10.0.0.1:86400
+*.local:10.0.0.1:86400 |
build the configuration in /etc/tinydns/root/data:
| Code Block |
|---|
| language | bash |
|---|
| theme | Midnight |
|---|
|
sudo make |
...
Restart tinydns:
| Code Block |
|---|
| language | bash |
|---|
| theme | Midnight |
|---|
|
sudo svc -h /etc/service/tinydns |
...
Confirm your dns lookups:
| Code Block |
|---|
| language | bash |
|---|
| theme | Midnight |
|---|
|
tapioca@ubuntu:~/tapioca$ nslookup asdf 10.0.0.1
Server:		10.0.0.1
Address:	10.0.0.1#53

Name:	asdf.localdomain
Address: 10.0.0.1 |
Edit the ~/tapioca/iptables_noproxy.sh file, wiping out the NAT Magic part at the end, replacing it with:
| Code Block |
|---|
| language | bash |
|---|
| theme | Midnight |
|---|
|
# NAT magic
iptables -t nat -F PREROUTING
iptables -t nat -A PREROUTING -i $internal_net -j DNAT --to-destination 10.0.0.1 |
...
Edit the ~/tapioca/iptables_mitmproxy.sh file, wiping out the NAT Magic part, replacing it with:
| Code Block |
|---|
| language | bash |
|---|
| theme | Midnight |
|---|
|
# mitmproxy interception
iptables -t nat -F PREROUTING
iptables -t nat -A PREROUTING -p tcp --dport 80 -j REDIRECT --to-ports 8080
iptables -t nat -A PREROUTING -p tcp --dport 443 -j REDIRECT --to-ports 8080
iptables -t nat -A PREROUTING -i $internal_net -j DNAT --to-destination 10.0.0.1 |
...
Create a ~/tapioca/wildcard.sh script to start mitmproxy HTTP(S) interception automatically on boot:
| Code Block |
|---|
| language | bash |
|---|
| theme | Midnight |
|---|
| title | ~/tapioca/wildcard.sh |
|---|
|
#!/bin/bash

echo Setting network redirection rules...
cd /home/tapioca/tapioca
/home/tapioca/tapioca/proxy.sh |
Ensure that the ~/tapioca/wildcard.sh is executable
| Code Block |
|---|
|
chmod +x ~/tapioca/wildcard.sh |
...
Configure the script to start automatically on X starting.
| Code Block |
|---|
| language | bash |
|---|
| theme | Midnight |
|---|
|
mkdir -p ~/.config/autostart
nano -w ~/.config/autostart/.desktop |
Edit the .desktop file to look like this:
| Code Block |
|---|
| theme | Midnight |
|---|
| title | ~/.config/autostart/.desktop |
|---|
|
[Desktop Entry]
Encoding=UTF-8
Name=Wildcard
Comment=Wildcard network redirection
Exec=/home/tapioca/tapioca/wildcard.sh
Terminal=false |
...
(optional) configure wildcard VM to automatically log in the tapioca user
| Code Block |
|---|
| language | bash |
|---|
| theme | Midnight |
|---|
|
sudo apt install mingetty
systemctl edit getty@tty1 |
Configure it to look like this:
| Code Block |
|---|
| language | bash |
|---|
| theme | Midnight |
|---|
|
[Service]
ExecStart=
ExecStart=-/sbin/mingetty --autologin tapioca --noclear %I |
...
Install apache and php, as you'll likely at least want a web server to simulate
| Code Block |
|---|
|
sudo apt-get install apache2
sudo apt-get install php libapache2-mod-php
sudo a2enmod ssl
sudo a2ensite default-ssl
sudo systemctl reload apache2 |
...
- Right click in the XFCE panel
- Click Panel → Add new items
- Click Launcher and then Add
- Right-click the new panel icon and click Properties
- Click
Add a new empty item - Call it what you want in the
Name field. e.g. "Apache log tailer" - In the
Command field, enter: sudo tail -F /var/log/apache2/access.log - For the icon, select
logviewer - Check the
Run in terminal checkbox
Using the wildcard Tapioca server
- For the VM where you'd like to analyze an exploit or malware, connect the virtual network adapter to the same vmnet number as the LAN adapter in the wildcard VM. Power on this VM and ensure that it gets an IP in the 10.0.0.x subnet.
- Ensure that the WAN adapter on the wildcard VM is disconnected. While the wildcard Tapioca VM will not route traffic originating on the LAN-side adapter to the WAN adapter, disabling the WAN adapter will ensure that it is not possible to reach the internet.
- Snapshot the wildcard VM. If you are running a truly unknown exploit or malware, you'll have to assume that the wildcard VM may get compromised. Given that CERT Tapioca relaxes security controls to allow for simple network analysis, the wildcard VM should be considered insecure.
- Ensure that the analysis VM is hitting the wildcard VM. e.g. open http://www.cert.org in the VM. It should load the Apache default page.
- For HTTPS interception to work, you must install the mitmproxy CA certificate in the analysis machine:
- Visit http://mitm.it in the analysis VM.
- Download the mitmproxy CA certificate file for the platform you are on
- For Windows, place the certificate in a manually-specified certificate store:
Trusted Root Certification Authorities
For other platforms, refer to the mitmproxy guidance for installing the CA certificate. - Confirm with IE that you can visit https://www.cert.org and you get no warning
- This only needs to happen once for any machine you're using for analysis
- Launch Wireshark to capture traffic on the LAN adapter.
- Open the exploit or any software you wish to observe in an isolated environment.
- Observe the network traffic to see what network resources the exploit requests.
- Place any resources as needed in the webroot
/var/www/html - Repeat (starting at step 7) as necessary.
- Revert the wildcard CERT Tapioca VM snapshot to the clean state created in step 3. above.
...